MEDSS Training
- Introduction
- Ch. 1: Searching for Events
- Ch. 2: Creating New Events
- Ch. 3: Event Specific Data
- Ch. 4: Modifying Person
- Ch. 5: Linking Events
- Ch. 6: Workflow Queues
- Ch. 7: Tasks
- Ch. 8: Sharing Events
- Ch. 9: ELR
- Ch. 10: Data Out - Reports
- Conclusion
MEDSS
- Home
- MEDSS Overview
- Electronic Lab Reporting
- Electronic Case Reporting
- MEDSS Training Resources
- MEDSS FAQs
Related Topics
Contact Info
Addendum New in 4.1 Features: MEDSS Training
This section explains some of the items that changed in MEDSS 4.1. It is not all the changes, just a few that are notable.
1. Recent Events - Bookmark it!
2. Jump To - Fast way from QP/Wizard to QP/Wizard
3. Create Event from Search screen
4. Deduplication - Display and Action
5. Filter/Unfilter - Based on Group Context
6. Person Summary - New layout - more information
7. Reports - Clickable case links (new option)
8. Session expire - now will be warned!
9. Lab Results - New Look/Actions
10. Free-Text Search (pending)
1. Recent Events - Bookmark it!
You now have the ability to bookmark Events on the Recent Events screen. The right most column displays grey stars with green crosses. If you click on the cross, the star will be become gold. The Event associated with that star will lock in place or become bookmarked. The Event will stay on the screen until you remove the bookmark (by clicking on the gold star). You should bookmark Events if you access many Events but would like to keep several available at all times.

2. Jump To - Fast way from QP/Wizard to QP/Wizard
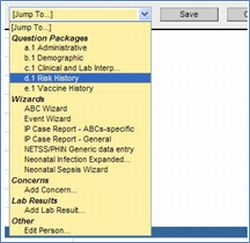
MEDSS now offers a jump to option for moving around within an Event. Simply go to the [Jump To…] box in the upper right of the screen (by the Save button) and select where you would like to go next instead of returning to the Dashboard screen. If you have made changes that you have not saved, you will be given the option to save or cancel your modifications.

3. Create Event from Search screen
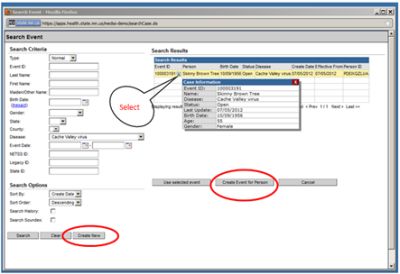
You now have the ability to create an Event from the Search screen. Search your normal way and results will appear on the right. Note there is now an icon magnifying glass icon after each Event ID - select and a preview will display (see below) for that Event to help determine if the Event displayed is the one you want.
Create Event - (Create New) button
It is now less confusing to create new events. When you search for an event and do not find a matching event, you can use the "Create New" button. The "Create Event - Person Information" page will display. Continue as you normally would.
Create Event - (Create Event for Person) button
If you find an Event in the list but would like to create a new event for the Person, you can use the "Create Event for Person" button. The "Create Event - Person Information" will display with the person fields filled from the original. You may change information as needed for the new Event and save.
4. Deduplication - Display and Action
Deduplication - Person and Event can be marked “pending”
On the "Create Event - Person Information" page, if you create a person assuming there were no potential matches and the MEDSS finds a match after you press (Save) you will get routed to the potential matches screen.
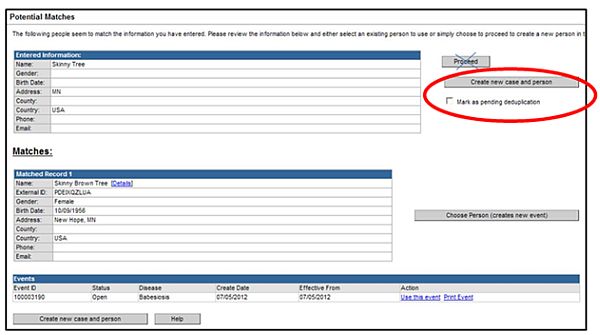
Instead of the “Proceed” button you now have a “Create new case and Person” button. If you are not sure this is a new person, you can mark it as “pending duplication”. This will create a new Person and Event but will mark them as “pending” so they will show up in your Person and/or Event deduplication Workflows for later analysis. If you know it is the same person, you may select the Choose Person (creates new event) button (which did not change) or the Action link “Use this event” (which did not change).
Deduplication - Score displays to aid in decision
There is now extra help to assist in the decision if a Person and/or Case are a match or not in the Workflow Deduplication queues. Once you select the proper Person or Case Deduplication queue from the Workflow Queues, you will see either the Person Deduplication list or the Case Deduplication list for the items that a manual decision is needed. Use the Select Action on the right to pick the Person and/or Case you would like to work on. Note that the different format allows more events to be shown on the screen.
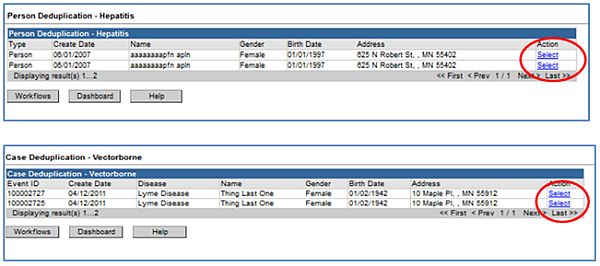
The next screen will display the information for the selected record and then all the matches MEDSS found for the record with a score displayed in decreasing order. The score is tabulated with preset criteria given to MEDSS. The new score feature lets you see how the score is created. If you press the “i,” the criteria used for the match will display in a box. The first example shows the score was 95% because the ‘Name’ matched, the Date of Birth matched and the Address matched.
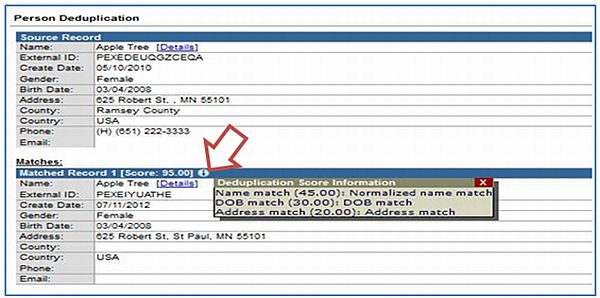
The second example displays a Matched Event with a score of almost 60% and indicates the Event was within the given timeframe for LYME to be the same Event for the given person.

5. Filter/Unfilter - Based on Group Context
There is now the ability to filter [Workflow], [Search Event] and [Recent Events] based on the various groups in which one is a member. This allows users who belong to multiple groups (TB, Hepatitis, or Influenza) to filter to a subset of their normal group list. If you are in more than one group, a new link is displayed after the user login name. It will display “Unfiltered” to indicate all group listings are active. If “Filtered” is displayed, some of the groups are being filtered.

To change the filtering, click on the link and the [Select Session Group] screen appears. Your associated groups for this session will display. The checkbox next to the “Group” title can be used to check or uncheck all of the line items in the list. The filtering from this screen is applied to group-specific workflows, searches and your Recent Events, rather than all Events and workflows that are visible to all your groups in the Workflow Queues.
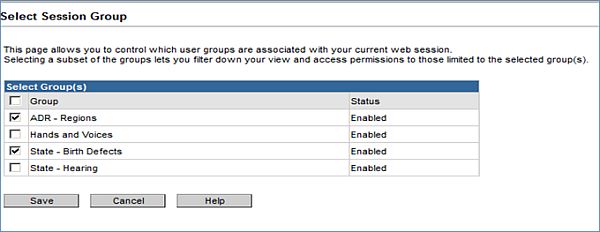
Once the user clicks on a subset of groups and saves the filter, the “Unfiltered” link in the Event Dashboard changes to read “Filtered” to remind the user that the filters are applied. Filters can be easily removed by clicking on the “Filtered” link on the Event Dashboard, then rechecking all the groups, and resaving to provide unfiltered results. The Filtering is reset once you logout.
6. Person Summary - New layout - more information
The Person Summary has been expanded to include more information about the person you are viewing. To access the Person Summary, press the hyperlink (person’s name) in the Basic Information section. (See below)
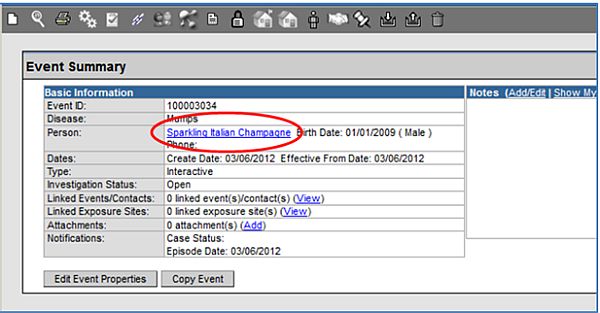
There are four sections “Person Summary,” “Event Information,” “Labs” and “Additional Information.” Given the right permissions, you will see across a party’s multiple events, links and labs.
The “Person Summary” screen displays information about the person. The Notes on the right are from the [Person Tab] and not the [Event Tab]. You can update demographic information by using the [Edit person] button.
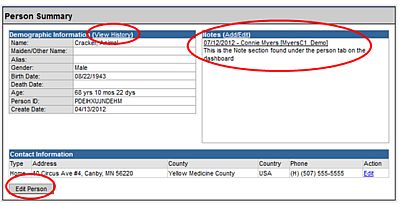
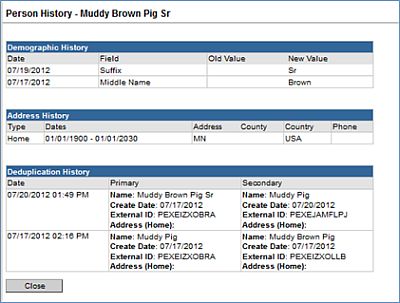
You can see the history for the person by using the [View History] link. The “Person History” screen has three sections “Demographic History,” “Address History” and “Deduplication History.” The screen will display all changes to the person’s demographics and/or address and if the person’s information was merged with another party denoting which record became the primary and which record was merged (secondary). Note: The Deduplication History will be recorded for display to the user as of MEDSS 4.1, so all past deduplications are not listed.
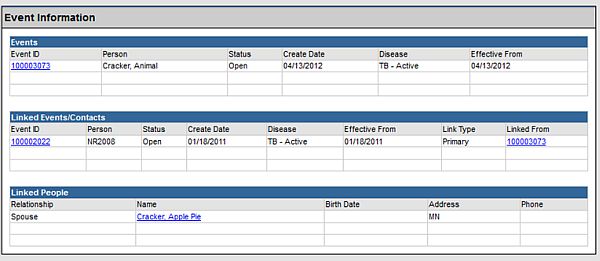
The “Event Information” displays all Events you have access to see for the given person, as well as Linked Events/Contacts and Linked People if you use those functions. The hyperlinks you see are the Events and/or People associated with the current person. Pressing one of the hyperlinks will exit you from the current “Person Summary” to the selected “Event Summary” or the selected “Person Summary." In the example below pressing the hyperlink "Cracker, Apple Pie" will take you to the “Person Summary” for Apple Pie Cracker. Pressing the hyperlink "100003073" will take you to the “Event Summary” for the TB-Active Event of Animal Cracker.
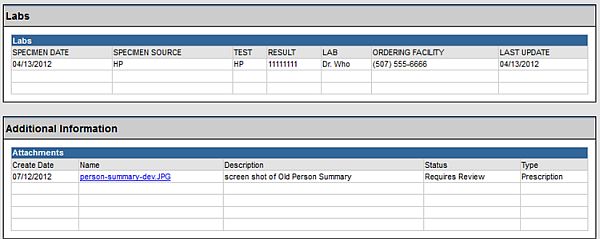
The “Labs” screen will display if there are labs to share. The “Labs” section will display the summary information for all labs for the party that you have access across Events. The “Additional Information” section displays the attachments associated with the event and person). The hyperlink will let you view and/or save the attachment.
7. Reports - Clickable case links (new option)
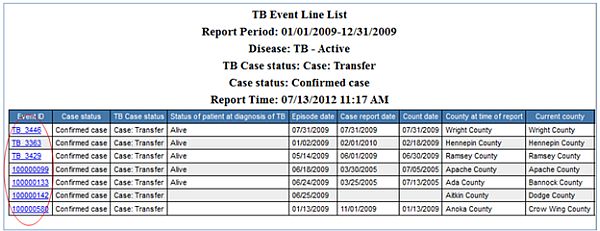
A new Reports feature can be used for any Ad-hoc ‘line list’ report. A Reports Administrator can turn the feature on if the CaseID field is selected from the “Case Fields”. The Administrator would then select [Render case IDs as links] in the “Advanced Options.”
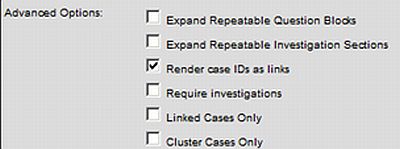
When you select the “Run Report” button for a report, the line list will display a hyperlink for each EventID. Note: The hyperlink does not work with “Export Results.” Select the desired Event by pressing the hyperlink.
8. Session expire - now will be warned!
MEDSS will log you out after 30 minutes of inactivity. You will get a warning about 2 minutes before that happens.
![]()
If you are inserting data into a Wizard or Question Package press "Save" to save your work or press the Refresh button (for many apps this is F5). The main point is to do something to the screen that forces a request to the MEDSS system. This triggers the timeout clock to reset for another 30 minutes. For example, you can also select a workflow; go to the Dashboard page; or press any of the dashboard Icons for an action.
9. Lab Results - New Look/Actions
The Lab information display on the “Event Information” section has changed. (It is a ‘work in progress’ at this time, so slight changes may occur until the final, final product!!) To see the details for a set of tests/susceptibilities for a particular lab, highlight this row. Details will display below in the section labeled “Details.” Even though you select one line, the Details Section will display all the details for this specimen ID#. In the example below, the Lab Specimen from 07/02/2012 had two tests - so two lines are showing in the “Labs” and both are displayed in the “Details.”
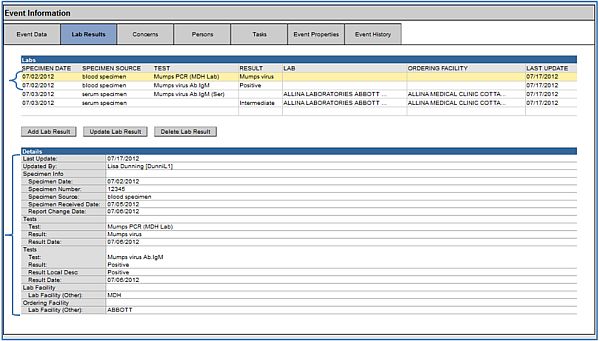
Lab Results - Test Results- More than one line
For each set of Lab Results, MEDSS will display a line for each Tests or Susceptibilities in the Results. (We hope to have the ‘Specimen Number’ on the line in the very near future).
Lab Results - Test Results- Add/Update/Delete (changed slightly)
The icons "Add Lab Result," "Update Lab Result," and "Delete Lab Result" did not change from 4.0 to 4.1. Select the line you would like to work with and press the icon. Note: The data action (add/modify/delete) you do in the “Edit Lab Result” screen may change the line you selected as well as any/all lines associated with this Specimen number as well as the “Details” below.
Lab Results - Sorting option for Lab
A new feature available in the Lab Results is the columns may be sorted by a click on the column name. To sort "SPECIMEN DATE" clink on the column labeled "SPECIMEN DATE." In the example below, it has been sorted by "SPECIMEN DATE" in descending order. An arrow appears showing the sort descending. If you want to change it to ascending - sort again by clinking on the column - the arrow will change to "SPECIMEN DATE."

10. Free-Text Search (pending)
One of the features is the Free-Text Search box. This allows you to perform Event queries from the main menu. The area is left of the "Search" button on the main menu.
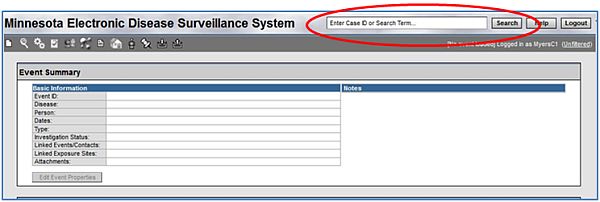
Free-Text Search- Basic Search
To perform a basic search, type the items into the search box and press "Search." For example:
![]()
... will perform a basic search for the words “Donald” or “Duck” within the searchable fields in all your Events. It would find “Donald Duck” as well as “Donald Rabbit” and “Silly Duck”. To refine the search to just “Donald Duck” you would enter:
![]()
This would display “Donald Duck” as well as “Donald M Duck” and “Donald D Duck.” To refine further, you could enter:
![]()
And this will display “Donald M Duck.”
You could build complex queries to filter the results down to exact Events that you are interested in. By using AND, OR and NOT conditions across search criteria you can reduce the results. For example: female AND Pertussis NOT (City=Minneapolis OR City=St Paul) will give the results of all Events with gender of female that have Pertussis who live outside of Minneapolis or St. Paul. Further query details are available from your MEDSS Support Team.
Free-Text Search - Search Terms are Case Sensitive
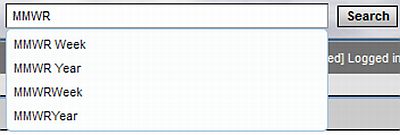
A ‘Search Term’ is defined as the fields from your MEDSS Model. You will need to know the correct spelling and case for the Term(s) you wish to use. Start typing a Term and possible Terms will display in a dropdown for you to select. You may select one of the Terms that will be placed in the search box for you to type the answer. You may add other Terms in the same fashion.
Free-Text Search - Dates need to be complete
When you search for a date, you will need to provide the complete date in the format MM/DD/YYYY. The example below will find all Events you have access with an Episode date of February 5, 2010 and “rose” is in one of the searchable fields.
![]()
Free-Text Search - Quotes may be needed - or not
There are times you will need to use quotes to produce the correct answers. And there is more than one way to find answers. The two requests below will produce the same results.
![]()
![]()
If you need assistance to find the correct Search Terms and/or the proper Answer format, please contact your MEDSS Support Team. Each MEDSS model has unique fields. A combination that works for one group may not be right for your group.